Deploying Web Spiders to Azure for Automated Daily Web Scraping
I used Azure cloud and a web scraper to to monitor the adoption status of dogs at large UK rescue centres. Here I describe how to put together this pipeline. The pipeline uses an Azure Logic App to run a containerised web scraper, which deposits scraped data into a SQL Server database.
(Before implementing a similar pipeline, make sure that web scraping is allowed by the site you plan to scrape!).
Setting up a SQL Server Database
All of the data obtained from web scraping will be stored in a SQL Server database hosted on Azure. So, the first step is to create this database. Begin by creating a SQL server to host your database on Azure. You can do this from the Azure portal webpage. Whenever creating Azure resources (servers, databases, container instances, Logic Apps), always consider the estimated costs.

Next, create a SQL server database. I strongly recommend creating a serverless database as this is much cheaper.

You can connect to this database through ODBC using the Python pyodbc library. The details required to connect to the database are available on its page on Azure portal. I store these as environment variables for security.
import pyodbc
import os

def create_connection(self):
  server = os.environ.get('SQLSERVER')
  database = os.environ.get('SQLDB')
  username = os.environ.get('SQLUSR')
  password = os.environ.get('SQLPSWRD')
  driver = os.environ.get('SQLDRIVER')
  self.cxn = pyodbc.connect('DRIVER='+driver+';SERVER='+server+';DATABASE='+database+';UID='+username+';PWD='+ password)
  self.csr = self.cxn.cursor()
You can then use Python to create any tables that you would like in your database.
self.csr.execute("""CREATE TABLE adoptions(
  petId nvarchar(450) NOT NULL,
  reserved int NOT NULL,
  dateScraped date NOT NULL,
  CONSTRAINT fk_adoptions_petId FOREIGN KEY (petId)
  REFERENCES pets (petId)
  )""")
Creating a Web Scraper
I chose to use Scrapy to create my web scraper. If you follow the tutorial on the Scrapy webpage, you can’t go far wrong. The bulk of the work here is creating two classes: a spider, to lift data from web pages and navigate between them, and a pipeline, to process the data that is obtained by the spider.
In my case, the spider always begins with the URL for the the first page that lists the dogs available for adoption. Using the contents of this initial page, it identifies all of the links to the pages for individual dogs. The XML contents of each of the dog’s page are then parsed by a function that extracts desired information such as breed, age, and description. When this is complete, the spider retrieves the link to the next page of dogs available for adoption, and repeats this process until there are no pages left.
Each time a webpage is scraped, the retrieved data is stored in a dictionary which is processed by the pipeline class. When instantiated, this class should connect to the SQL Server database on Azure using pyodbc using the relevant connection strings, as shown in the previous section.
def __init__(self):
  self.create_connection()
The pipeline class function process_item will be called every time a dog’s webpage is scraped. This function should be written so that it takes the dictionary created for that webpage by the spider and enters the data into the SQL database. This can be achieved using the connection created when the pipeline class was initiated and pyodbc’s execute function.
Containerising the Web Scraper
Once you are happy with your web scraper, save all of its dependencies into a requirements.txt file using pip freeze. Now you will create a Docker image that will package the web scraper and its dependencies together. By having the web scraper in a Docker image like this, it can be launched anywhere without having to worry about installing dependencies beforehand.
To create an image, you need to write a Dockerfile which contains the instructions on what should be in the container. You don’t need to start from scratch: I used an official Python Docker image as the basis for mine. Using one of these will mean that your container will already contain a version of Linux and Python.
FROM python:3.8.7-buster

WORKDIR /usr/src/app
Then, I needed to install some software for interacting with the SQL Server database that doesn’t come with the Python Docker image. These can be installed by telling the Docker container to run apt-get commands:
RUN apt-get update \
 && apt-get install -y gnupg2 \
 && apt-get install -y curl \
 && curl https://packages.microsoft.com/keys/microsoft.asc | apt-key add - \
 && curl https://packages.microsoft.com/config/debian/10/prod.list > /etc/apt/sources.list.d/mssql-release.list \
 && apt-get update \
 && ACCEPT_EULA=Y apt-get install -y msodbcsql17 \
 && apt-get install -y unixodbc-dev
Then, you want to install the Python libraries required for the web scraper. First, copy all of the code and the requirements.txt file into the container. Then the dependencies can be installed using pip install:
COPY . .
RUN pip install --no-cache-dir -r requirements.txt
Finally, the Docker container needs to be told to run the web scraper once it has finished setting up. I contained the command to launch the web scraper within a shell script so that I could run multiple spiders, but you could also use scrapy crawl spider_name here.
CMD ["./run.sh"]
Uploading the Container Image to Azure
We are now going to upload the container to Azure. To do this, create an Azure Container Registry and push the Docker image to it. This tutorial details how you can do this using the Azure CLI. If successful, the container registry will be visible on your Azure portal, and the image should be visible under Services > Repositories.

Now the Docker image lives on Azure, you can create a container instance. I did this using Azure portal. Search for ‘container instance’ and hit create. For ‘Image source’ select ‘Azure container registry’. Use the drop down menus to select the image you uploaded in the previous step.

Make sure that you navigate to the ‘Advanced’ tab and enter any environment variables that are required for your web scraper (e.g. the connection strings for your database).

Fill out everything else as you desire. Once created, test your Docker image runs properly by hitting Start on the home page of the container instance. If it works it should enter the results of the web scraping into the SQL Server database.

Running the Container on a Schedule
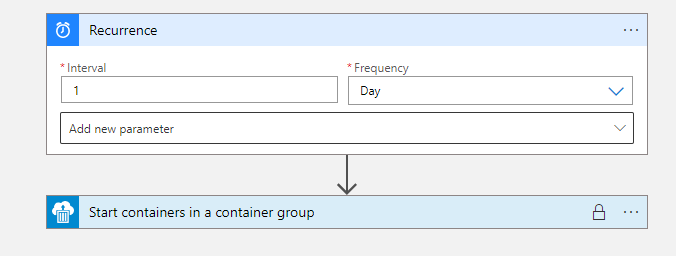
To launch the container on a schedule I used a Logic App. Logic Apps are small pipelines that run in response to certain triggers. Create a new Logic App in Azure Portal, and head to the Logic App Designer. The pipeline will have two steps: ‘Recurrence’ (the trigger) and ‘Start containers in a container group’ (the response to the trigger).

The Recurrence step of the pipeline causes the action to occur at regular intervals. I set mine to launch the Docker container once a day.
Under the ‘Start containers in a container group’ tab you can enter the name of the container instance that you created earlier. Enable your Logic App, and then check back to make sure the web scraping is occurring without error at your selected time interval.
Adding a New Spider
Over time, I have added new spiders that extract information on pets up for adoption from different sites. To do this, I create the new spider and integrate in into the Docker image. Once I know everything works, I can then push these changes to the container registry using docker push as before, updating the image tag. You can see the different versions of your Docker image that you have uploaded to the registry by clicking on the repository name in Services > Repositories.
You will need to delete the old container instance and create a new one that uses the most recent version of your Docker image. Make sure you select the most recent version of the image in the ‘Image tag’ drop down when recreating the container instance. And don’t forget to add the environment variables under ‘Advanced’!
If you’ve kept the name of the instance the same as before, there’s no need to change the Logic App. It will now run the updated version of your container.
Downloading the Data
The data I gathered were not too large, so I used the bcp CLI to obtain the contents of my database tables in delimited text format. The positional argument to this command is the SQL query you would like to execute. The value given to -S is the name of the SQL Server which can be found on its Azure webpage. The value given to -d is the name of the SQL database. You will be prompted for your Azure password.
bcp "SELECT * FROM table" queryout "filepath.csv" -c -S .database.windows.net -d database_name -t ',' -u username
Now you have the fruits of your labour!